Saturday, May 28, 2016
Rings 'n Rosies
Monday, May 16, 2016
Jelly Roll Quilting
Friday, April 8, 2016
Back again!
Friday, October 2, 2015
Spring Blossoms Quilt
This quilt came together by accident. As I was cutting out the fabric, I accidently cut two different sizes of ‘plates’. When put together, they make a cute ‘blossom’. Wasn’t that a lucky accident?
It was great fun to make and I’ve already started to write up the instructions for this cutie.
My kitty cat enjoyed getting in the way of the photo shoot. I think he wanted a little attention.
It’s made from the Bonnie and Camille line “Marmalade” and may have a few pieces of “Scrumptious” thrown in. It measures 62 1/2 inches square.
It’s a fun little quilt to make!
Stormy
Saturday, August 15, 2015
Finishing the Pinwheel Quilt
*Originally, I had not planned to put a border on this quilt. But when it was all pieced together, it seemed to be floating and needed an anchor. This is why, in my original instructions, the border fabric was not included. Luckily, I had enough backing fabric to use for the border. *
Finishing Instructions
Trim all the blocks to 12 1/2 inches.
Using the picture above as a layout guide, sew your blocks together row by row. Press the seams for each row in opposite directions so they lock when sewing together. Pin well and sew the rows together. Press.
Fabric Requirements
Borders
For borders you will need 3/4 yard of fabric.
Cut fabric into 7 strips 3 1/2 in. x WOF. Piece these strips into:
2 – 61 in. x 3 1/2 in. strips for the sides and
2 – 66 1/2 in. x 3 1/2 in. strips for the top and bottom.
Binding
For binding you will need 1/2 to 2/3 yard of fabric. (1/2 yard will only give you 1/2 inch to spare, so if you are worried about making a mistake, get 2/3 yard.)
Cut 7 strips 2 1/2 in. x WOF.
Step 1
Take one 61 in. border strip and pin to quilt right sides together. (I recommend finding the middle point of both the quilt and border and pin first. Then, pin the two ends. That way when pinning the rest of the border, you can ease the fabric, if needed, for a proper fit.)
Sew border onto quilt. (*hint – When sewing on borders, always sew with the quilt back facing up. That way, you can check to make sure you are not cutting of any points of your quilt blocks.)
Sew the next 61 in. border strip onto the opposite side. Press both strips towards the border.
Step 2
With the 66 1/2 in. strips. Sew the top and bottom border pieces on using the same method. Press towards the borders.
Your are finished!! Hooray!
Quilt as desired and be sure to send me a picture of your quilt. I would really love to see what you have done!
Stormy
Thursday, August 13, 2015
Block of the Month–Month 7–Spinning 9 patch
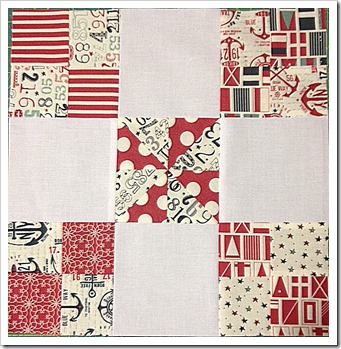
This is the last block that finishes up our quilt! I don’t know if it has a name, so I’m calling it the Spinning 9 patch. You will be making 13 of these blocks.
Fabric Requirements
(Requirements for 13 blocks)
Background solid – Cut 52 – 4 1/2 in. squares
Pinwheel - Misc. Dark Fabrics- Cut 13 – 4 1/2 in. squares
Pinwheel - Misc. Light Fabrics– Cut 13 – 4 1/2 in. squares
Four Patch - Misc. Dark Fabrics– Cut 26 – 5 in. squares
Four Patch - Misc. Light Fabrics – Cut 26 – 5 in. squares
Step 1
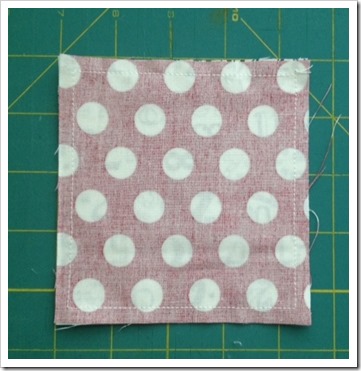
Using one light 4 1/2 in. pinwheel square and one dark 4 1/2 in. pinwheel square, layer rights sides together. Sew 1/4 in. around the four sides.
Step 2
Cut sewn squares diagonally both directions to form 4 half square triangles.
Step 3
Press open and lay out pinwheel block.
Step 4
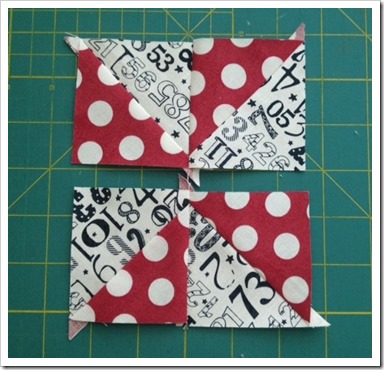
Sew together into rows making sure to lock in seams, before pinning. Sew top row and bottom row together. Press.
Step 5
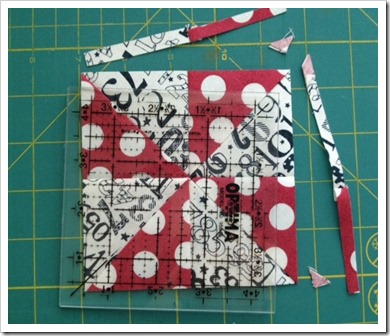
Trim pinwheel to 4 1/2 inches. Make 13 pinwheel blocks.
Step 6
Using one light 5 in. square and one dark 5 in. square layer right sides together. Sew 1/4 in. along two sides opposite of each other.
Step 7
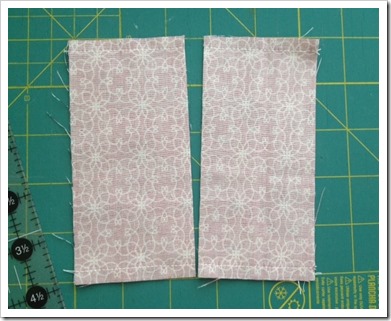
Cut square in half forming two rectangles.
Step 8
Cut rectangles in half forming four, 2 1/2 in. square units.
Step 9
Press open. Sew together top row and bottom row to make a 4 patch square.
Step 10
Press and trim square to 4 1/2 in. Make 52 four patch blocks.
Step 11
Lay out blocks into 9 patch unit using blocks from different fabrics, making sure to keep the dark corner squares of the 4 patch blocks in the corners by the pinwheel. This creates the chain throughout the quilt.
Step 12
Sew 9 patch together into rows. Then sew rows together. Again, be sure to nest seams together before pinning. (Be careful not to turn one of the rows upside down like I did to the bottom row in this picture!)
Make 13 of these blocks.
You have now finished making all the quilt blocks! I will post the finishing details on putting the blocks together and adding a border in another day or so.
Stormy
Monday, August 3, 2015
Moda Love Baby Quilt
My newest niece was born in July, so I had to make her a quilt. Baby quilts are the most fun to make because they are quick to finish and its fun to think about who will be using them.
I used the free “Moda Love Quilt Pattern” again to make this quilt, but added a 5 inch border to enlarge the size. Finished it measures 42x42.
It’s made with one charm pack, so it’s super easy to piece. I’ve been saving this fabric for years waiting for just the right project. The fabric line is “Sunwashed” by “Sweetwater”.
The combination of dots stripes and daises are my favorite! Pink and grey have always been a favorite color combo of mine.
Too bad the quilt gets to cuddle with the baby before I do…
Stormy
Friday, July 17, 2015
Block of the Month–Month 6–Flying Kite
Sorry for the delay posting block 6 this month. I’ve been vacationing for the last 2 1/2 weeks, but now I’m finally back home and excited to get sewing again!
I’ve always loved this block and I’ve made it in a few different sizes, but never in a 12 inch block and not using paper piecing. I figured it wouldn’t be hard to write a pattern in the size I wanted, so I gave it a try and was not happy with the results. The measurements were odd sizes and the instructions difficult to follow. So, I tried it again and it turned out better, but it still wasn’t quit right. What I finally ended up doing was using a pattern that is written for a larger quilt block and cutting it down to the right size. With this method, there is a little more fabric wasted than I would like, but the results were much better than the previous two tries. I’m sure you would agree if you went through the process with me!
Fabric Requirements
Fabric 1 – Background – Cut 1 – 8 1/4 in. square and Cut 4 – 2 3/8 x 7 7/8 in. rectangles
Fabric 2 – Pinwheel – Cut 1 – 8 1/4 in. square
Fabric 3 – Pinwheel - Cut 4 – 6 x 7 7/8 in. rectangles
Step 1
Cut the Fabric 1 and Fabric 2 squares in half diagonally each way creating 4 triangles.
Step 2
Take a Fabric 1 triangle and a Fabric 2 triangle. Lay them right sides together and sew together to form one large triangle. Repeat to form 3 more triangle units.
Press towards the darker fabric.
Step 3
Using the Fabric 1 rectangle and the Fabric 3 rectangle, sew right sides together to make one large square. Repeat 3 more times.
Press towards darker fabric.
Step 4
Lay a ruler across the square from bottom left to top right and cut into two triangles. Discard the bottom triangle (or save for another project).
Step 5
(Forgot to take a picture without the ruler here. Sorry!) Sew triangle units together to make a square unit.
Step 6
Trim block to 6 1/2 in. making sure the seam from the triangle unit is in the center of the block. If you don’t have a 6 1/2 in. ruler. Press diagonally each direction to find your center point and use that as your cutting guide.
Step 7
Sew together the top row then the bottom row. Press the center seam for each row the same direction. Then when you flip the 2nd row upside down the seams will nest together for better accuracy in seam matching. Pin well and sew rows together. Press.
Make one more Flying Kite block and you are finished!
Again, this method is not the most economical, but is the easiest and most accurate method I found. I love the way it turned out!
Stormy
Friday, June 26, 2015
Niner Quilt Finish
Years ago I saw a quilt at an antique quilt show I fell in love with. It was called ‘Nine Patch Cross’. I planned on writing my own quilt pattern so I could make a copy of the antique quilt. A few months later Camille from Thimble Blossoms released a pattern very similar to the one I was working on! Instead of finishing my pattern I bought hers and waited for the right fabric line to come along.
I fell in love with ‘April Showers’ by Bonnie and Camille and bought the fabric to make my quilt.
It took me a while to get started, but once I did it went together fairly quickly.
I tried a new quilting pattern that I really like. I’ll definitely be using it on other quilts.
And of course, I had to use striped binding….
Stormy
Friday, June 12, 2015
Block of the Month–Block 5–Churn Dash Pinwheel
I’m a little late posting this month’s block. It seems all the pictures from this block have disappeared! So, I started from scratch, made a new block and took pictures along the way.
I’ve recently become a fan of the churn dash block and thought it would be fun to include it in this quilt with a bit of a twist…. a pinwheel in the center!
Fabric Requirements
Fabric 1 – Blue Dot – (2) 5 in. squares, (1) 4 1/2 in. square
Fabric 2 – Aqua print – (2) 4 1/2 x 5 in. rectangles
Fabric 3 – Background – (2) 5 in. squares, (1) 4 1/2 in. square, (2) 4 1/2 x 5 in. rectangles
Step 1
Using 4 1/2 in. squares from fabric 1 and background fabric, layer squares right sides together. Sew 1/4 in. around all four sides of square.
Step 2
Cut sewn square diagonally twice.
Step 3
Press open to darker fabric. Lay out pinwheel on table making sure it is spinning in the direction you like.
Step 4
Sew together top row then bottom row. Press. Then nestling the center seam, sew the rows together.
Step 5
Press open and trim to 4 1/2 inches. (I make the pinwheels a little larger than normal to ensure plenty of room to trim to the perfect pinwheel.)
Step 6
Lay fabric 2 rectangle right sides together with background fabric rectangle. Sew 1/4 in along each 4 1/2 in. side.
Step 7
With the sewn edges running along the sides, cut rectangle in half (2 1/2 in.) Press open. Repeat for remaining 3 rectangles.
Step 8
Draw a diagonal line on the back of the background fabric 5 in. squares.
Step 9
Layer background square right sides together with Fabric 1 – 5in. square. Sew 1/4 in. along both sides of the drawn line.
Step 10
Cut along drawn line and press open.
Step 11
Trim half square triangle to 4 1/2 inches. Repeat steps to make 2 more half square triangles.
Step 12
Lay out squares to form blocks. Sew together in rows. Press seam on top and bottom row towards the center block. On middle row, press seams outward away from the pinwheel.
Step 13
Nestle seams and pin. Sew rows together. And your are finished with month 5!
Stormy


