Monday, March 2, 2015

Block of the Month–Month 2–Double Pinwheel

This block is the second easiest block in this quilt.  It is called the double pinwheel.

Double Pinwheel 1

Fabric Requirements

Fabric Requirements

Fabric 1 (large triangle) – (cut 2) 6 7/8 in. squares cut diagonally once into 2 triangles.

Fabric 2 (small triangle) – (cut 1) 7 1/4 in. square cut diagonally twice into 4 triangles.

Fabric 3 (background) – (cut 1) 7 1/4 in. square cut diagonally twice into 4 triangles.

Step 1

Step 1

Layer fabric 2 RST (right sides together) with fabric 3.  Sew 1/4” along the short side of the triangle.  Press open.  Repeat for remaining 3 triangles. 

Step 2

Step 2b

Place sewn triangles RST with fabric 1 triangle.  Sew long edges together.  Be extra careful to not stretch the fabric as you are sewing since it is cut on the bias.  Press towards large triangle.

Trim to 6 1/2 in. square.

Step 3

Step 3

Lay squares in a four patch.  Sew the top row together then the bottom row.  Press towards fabric 2.  Sew rows together making sure to pin the center.  Press seam open to help with the thickness of the center seam.

Double Pinwheel 1

Your pinwheel is finished!  Now make one more using different fabrics.

Double Pinwheel 2

You are finished with month 2!  Pat yourself on the back (and maybe eat a little chocolate).

Stormy

Thursday, February 26, 2015

Pinwheel Star Quilt Tutorial

A little while ago I had a quilt idea pop into my head. It’s a pretty fun and easy quilt to make. So, I thought I’d write up a quick tutorial….

Pinwheel Star Quilt

I will post more pictures of it when it is quilted.  Life got in the way and it’ll be awhile before I can finish it; but I decided to write the tutorial sooner rather than later.

QUILT STATS

Each block measures 20 inches square.  The finished quilt is 3 blocks wide by 4 blocks long or 60x80.  I have written the fabric requirements and cutting instructions for individual blocks or for the entire quilt.  That way, you can easily figure yardage if you want to change the size of your quilt. I hope it’s not confusing!

FABRIC  REQUIREMENTS (for individual blocks or 60x80 quilt)

Background fabric – 1/3 yard for each block or 3 1/2 yards total

Fabric 1 (star points) – 1/3 yard each or 4 yards total.

Fabric 2 (center pinwheels and corner triangles) – 1/4 yard each or 3 yards total.

Because I was not planning on doing a tutorial when I made this quilt, I neglected to take pictures.  So, I made another block using different fabrics for this tutorial.

Fabric Requirements

Cutting Instructions

Background Fabric – cut (4) or (48) 6 in. squares and (4) or (48)  5.5 x 10.5 in. rectangles

Fabric 1 (star points)– cut (8) 5.5 in. squares

Fabric 2 – (pinwheel and corner triangles) – cut (4) 6 in. squares

Step 1

Draw a diagonal line across the back of all the Fabric 1 and Fabric 2 squares.

Step 1

Step 2

Layer background fabric squares with Fabric 2 squares RST (right sides together) and sew 1/4 in. away from drawn line.  Then, turn and sew 1/4 in. down the other side.

Step 2

Step 2b

Cut on drawn line to separate into 2 HST (half square triangles).

Step 2b

Step 2c

Press open and trim to 5.5 in. square.

Step 2c

Step 3

Lay out HST into pinwheel pattern.

Step 3

Step 4

Sew rows together using 1/4 in. seam allowance.  Press towards darker fabric.

Step 4

Step 5

Sew rows together.  (Press the seam open to help with the bulkiness in the center of the pinwheel.)

Step 5

Step 6

Align Fabric 1 square with Background Fabric rectangle RST.  Sew along line.

Step 6

Step 7

Trim off excess fabric by cutting 1/4 in. away from sewn line. Press open.

Step 7

Step 8

Align second Fabric 1 square along the opposite side of Background Fabric rectangle.  Sew along drawn line.

Step 8

Step 9

Trim excess fabric 1/4 in. away from drawn line.
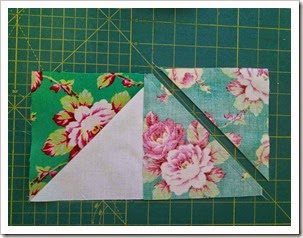
Step 9

Step 10

Press open to form Flying Geese block.

Step 10

Step 11

Make row 1 and 3 by laying out HST’s with Flying Geese block.  Sew together and press toward the center block.

Step 11

Step 12

Make center row by sewing Flying Geese blocks to center pinwheel.  Press towards the Flying Geese blocks.
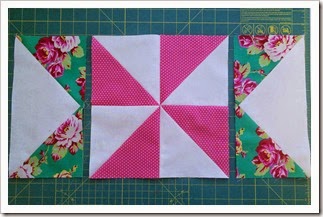
Step 12

Step 12b

Helpful hint – When sewing Flying Geese blocks onto pinwheel, make sure your stitches pass barely above the crossed stitches that make the point of the cream triangle.  That way, you will always get a perfect point.

Step 12b

Step 13

Lay out rows and sew together making sure to pin the corners and also matching the center of the pinwheel to the center of the flying geese block. Sew rows together. Press.

Step 13

Finished Block

Now make 11 more and sew together row by row and your quilt top is finished!

Pinwheel Star

I think I’ll make this block into a pillow for my daughter’s bed! Smile

Stormy

Tuesday, February 3, 2015

Pinwheel Block of the Month–Week 1–Friendship Star

**Update – A few notes on yardage.  For this quilt, I bought a fat quarter bundle (which consisted of 40 fat quarters) to get a large variety of fabrics.  I used about half of the fabric.  I don’t have an exact amount for this project, but I would recommend buying about 3 yards of various prints and 2 yards of solid.  The finished quilt measures 60 inches square.**

For the first month of the Block of the Month quilt, we are going to start with the easiest block  – the Friendship Star. 

Block of the Month

Fabric Requirements

Friendship Star 1

*Note – When making half square triangles, I like to cut my squares 1/8 inch larger. Then, I trim down after sewing.  It is easier to measure and  I can make sure my half square triangle is the exact size.  Example – For this block the square measurement would be 4 7/8 inch, but I round up to 5 inches.

Fabric 1 – center square  (1)  4 1/2 inch square

Fabric 2 – star  (2) 5 inch squares

Fabric 3 – background (2)  5 inch squares and (4) 4 1/2 inch squares

Step 1

Draw a line diagonally across fabric 2 squares.

Step 2

Stack your background fabric and fabric 2 squares RST (right sides together).  Sew 1/4 inch down the right side of the drawn line.  Turn and sew along the other side of the line.  Repeat for second square.

Step 3

Cut squares diagonally along drawn line.

Step 4

Press open and trim HST (half square triangle) to 4 1/2 inches.

Step 5

Arrange squares and sew together block by block, pressing away from the HST.  Then sew row by row.  Press.  Make a second block from different fabrics. 

Hope you enjoyed this block!  The second block will be posted the first week of March.

Stormy

Tuesday, January 27, 2015

Pinwheel Block of the Month quilt

I just finished the quilt top for my upcoming block of the month quilt! Here is a peek at what the finished quilt top looks like.

Pinwheel Block of the Month with 'Boathouse'

I designed it last October when I sprained my ankle and couldn't walk for a week.  At least one good thing came out of it, right?  I used the fabric 'Boathouse' by Sweetwater.  It measures 60x60.  The blocks are 12 inches finished.  Twelve blocks are pinwheels and 13 blocks are nine patches. 

Block one will begin the first week of February.  Each month we will make two of the same pattern block from different fabrics.  The nine patch blocks will come last in month seven.  

I hope you can join me!
Stormy

Thursday, January 15, 2015

Finished French Valentine Quilt

I wasn't sure if I liked the blocks or not.  Then, I thought I chose the wrong sashing and border. Then, I thought I messed up the quilting!  This quilt made me second guess myself again and again; and it was supposed to be a quick and easy quilt! But after all the stress, I looked at the finished quilt, and I loved it!  


It started out as a Valentine quilt using Riley Blakes 'Lost and Found Heart' fabric.  Then I threw in some fabrics from my stash and added a french border, so now it is my french Valentine quilt! It really was fun to make. I think I just need a little more practice making scrappy-ish quilts.  


It looks beautiful on the back of my sofa and its going to look beautiful with all the Valentine decorations.

Stormy

Friday, January 9, 2015

Stash building and Valentine's sewing

One of my favorite parts of vacationing in Utah (besides seeing family) is all the many wonderful quilt shops!  Whenever I get up there, I go to as many shops as possible.  (I have to make up for not having any where I live. Sad.)
This past year, I have wanted to make more scrappy quilts. So, I went on a stash building hunt.  It was great fun.  I may have gone a little overboard, but I ended up with....


So much eye candy! I just love to sit and look at all my newly acquired pretties.

As soon as the kids went back to school, I began to sew and sew.  My French style Valentine's quilt was the result.


I've also started working on my new block of the month.  I'll have a few sneak peak pictures to show soon.

Stormy


Thursday, January 1, 2015

New Year's Crafts!

We made it back from all our Christmas travels and finally had a day to relax.  My daughters got some fun little sewing kits from Santa, so we decided to do a little crafting.


They turned out so cute. What a fun way to get kids interested in sewing! 

Stormy