Saturday, May 9, 2015

Butterscotch and Rose Quilt

I’m super excited to be posting about this quilt.  The pattern is called “Dream Big” from Camille Roskelley’s book “Simplify”.   The fabric is “Butterscotch and Rose” by Fig Tree Co.  I cut the fabric out three or four years ago, but because of little feet running in and out of my sewing room across my ‘design floor’, I never managed to sew it together.  Now that the little feet are all in school, my quilt could sit safely on the floor while I pieced it together.

Dream Big Quilt

The problem with sewing projects years after buying the fabric is that you can’t remember which fabric is supposed to go where.  Maybe I’m the only one to have that problem…. I finally figured it out and started second guessing my earlier decisions.  I wasn’t sure if I was happy with the border and binding fabric.  But, after sewing it all together, I loved it!  (I never should have doubted myself!)

Dream Big Quilt

When I was laying out my quilt squares, I realized I was missing three rows of rectangles and would have to shorten the quilt from the original pattern.  I looked everywhere and could not find the missing rectangles…….. until.

Butterscotch and Rose quilt and pillow

I spread out the finished quilt across my bed and wallah! I had a matching pillow! How did that happen? Somehow I must have thought the rectangles were extras and used them to make my pillow.  Even though the pillow has been on my bed for years, I still didn’t realize.  I’m such as space cadet these days.  But, it all worked out in the end. Yeah!

Stormy

Friday, May 8, 2015

Block of the Month–Block 4–Pinwheel on Point

The last month flew by so fast, I can’t believe it is already time to post the next block!  This block is called ‘Pinwheel on Point’ for obvious reasons. It’s a fun block that goes together quickly.

Pinwheel on Point 2

Fabric Requirements

2015-01-07 15.34.53

*Note – The fabric requirements picture for this block went missing somehow, so I found the closest picture that would work.  The only change is the size of the cream squares.*

Fabric 1 -  Stripe pinwheel – (2) 4 in. squares

Fabric 2 – Star triangles – (2) 4 in. squares

Fabric 3 – Background – (4) 4 in. squares and (2) 7 in. squares

Step 1

2015-01-16 12.55.54

Draw a line from corner to corner across the back of two cream background squares.

Step 2

Layer two squares right sides together with two stripe squares.  Sew 1/4 inch away along the line.  Turn and repeat along the other side.

Step 3

Cut squares along line and press open to make four half square units.

Step 4

Trim squares to 3 1/2 inches.

Step 5

Sew squares together into two rows, then sew the rows together making sure to pin the center carefully.

Step 6

(Sorry!  Must have missed a picture here!)

Cut remaining 4 inch blocks and both 7 inch blocks in half diagonally. Set aside larger triangles for later.

Step 7

Sew fabric 2 triangle together with background triangle forming a larger triangle.  Press open.

Step 8

Sew triangle units to pinwheel units, making sure to pin center seams together.  Sew on the top then bottom, then the two sides. 

Step 9

Press open. Trim.

Step 10

2015-01-16 13.47.29

Finger press the large triangles in half to find the center point.  Match that center point to the center of the pinwheel block.  Pin and sew the large triangles to the pinwheel block the same method as Step 8.  Press open and trim block to 12 1/2 inches. 

Pinwheel on Point 1

Repeat all steps to make a second Pinwheel on Point block and you are finished with month 4!

Stormy

Thursday, April 16, 2015

Finished Blossom Quilt

I’m so excited about my newly finished Blossom Quilt!  I pieced it together about two years ago and never quilted it because I couldn’t decide on a quilting pattern.  A few days ago, I got in the mood to finish something and there it was, patiently waiting after all this time.

Blossom Quilt - With Fabric and Thread

The wind wasn’t being very cooperative during the photo shoot and my two kiddos holding up the quilt were on tiptoe with tired arms.  But, we did manage to get a few decent pictures. 

The quilt pattern is from the book “With Fabric and Thread” by Fig Tree Quilts and is called ‘Blossom’.  It is the whole reason I bought the book.  I’ve seen a few variations of this quilt and all of them are so pretty. The pattern is simple and classic.

For the backing and binding I chose fabric from the Bonnie and Camille line ‘Marmalade’.  The greens matched perfectly and stay with the two tone theme.

Blossom Quilt

I tried out a new quilting pattern on this quilt also.  It’s a busier pattern, but I really like the contrast with the simplicity of the quilt.

Blossom Quilt Quilting

And it’s kitty approved, so we’re all happy!

Stormy

Wednesday, April 8, 2015

Block of the Month–Month 3–Sawtooth Star

Block three in our quilt is an oldie, but a goodie.  The Sawtooth Star.  It’s one of my favorite blocks to make because it’s easy, but very pretty. 

Sawtooth Star

Fabric Requirements

Fabric Requirements

Fabric 1 – Star Points – (4) 4 in. squares

Fabric 2 – Pinwheel – (2) 4 in. squares

Fabric 3 – Background – (4) 3 1/2 in. squares and (6) 4 in. squares

Step 1

Sawtooth Star Step 1

Draw a diagonal line across all 6 of the 4 inch background squares.

Step 2

Sawtooth Star Step 2

Place background squares right sides together with the (4) triangle squares and the (2) pinwheel squares.  Sew 1/4 inch along the right side of the drawn line.  Chain stitch along all six, then turn and sew 1/4 inch along the other side of the drawn line.

Step 3

Sawtooth Star Step 3

Cut along drawn line.  You now have two half square triangle units.  Press open.  Repeat for remaining 5 blocks.

Step 4

Sawtooth Star Step 4

Trim  half square triangle units to 3 1/2 inches.

Sawtooth Star Half Square Triangles

Step 5

Sawtooth Star Step 5

Lay out the quilt squares into the Sawtooth block pattern, using the 3 1/2 inch background squares for the corners.  Sew together rows by sewing two blocks together into two patches, then sewing the two patches into a row.  Press seams all one direction.  On the next row press seams the opposite direction.

Sawtooth Star Step 6

Step 6

Sew  rows together by locking in each seam and pinning carefully. 

Sawtooth Star 2

(I forgot to take pictures of some of my finished squares before sewing them  into the quilt.  oops!)

Repeat all your steps to make a second Sawtooth Star and you are finished for month 3!

Stormy

Monday, April 6, 2015

Moda Love Quilt

I saw this adorable quilt pattern on Instagram a while ago and I knew I had to make it soon.  This awesome pattern can be made out of a Layer Cake, Charm Pack, or Mini Charm Pack. 

I sifted through my large stack of Charm Packs to find just the right fabric line.  What I found was ‘Botony’.  I had forgotten all about it, but I knew it would look great in this quilt.

Moda Love quilt Botony fabric

This cutie finishes at 32  inches square.  It was so easy,  I made the entire quilt in a weekend. 

Moda Love quilt 3

I especially love the backing I found to go with it.  I thought I’d have to go with a solid because I wouldn’t be able to match the fabrics.

Moda Love Quilt Closeup

But no! I found a print I like so well, it will probably turn up somewhere else.

Moda Love 2 quilt

I decided to do some straight line stitching for the quilting.  I’m pretty happy with the results!  I hope the person I’m giving this to enjoys it as much as I do!

Stormy

Monday, March 2, 2015

Block of the Month–Month 2–Double Pinwheel

This block is the second easiest block in this quilt.  It is called the double pinwheel.

Double Pinwheel 1

Fabric Requirements

Fabric Requirements

Fabric 1 (large triangle) – (cut 2) 6 7/8 in. squares cut diagonally once into 2 triangles.

Fabric 2 (small triangle) – (cut 1) 7 1/4 in. square cut diagonally twice into 4 triangles.

Fabric 3 (background) – (cut 1) 7 1/4 in. square cut diagonally twice into 4 triangles.

Step 1

Step 1

Layer fabric 2 RST (right sides together) with fabric 3.  Sew 1/4” along the short side of the triangle.  Press open.  Repeat for remaining 3 triangles. 

Step 2

Step 2b

Place sewn triangles RST with fabric 1 triangle.  Sew long edges together.  Be extra careful to not stretch the fabric as you are sewing since it is cut on the bias.  Press towards large triangle.

Trim to 6 1/2 in. square.

Step 3

Step 3

Lay squares in a four patch.  Sew the top row together then the bottom row.  Press towards fabric 2.  Sew rows together making sure to pin the center.  Press seam open to help with the thickness of the center seam.

Double Pinwheel 1

Your pinwheel is finished!  Now make one more using different fabrics.

Double Pinwheel 2

You are finished with month 2!  Pat yourself on the back (and maybe eat a little chocolate).

Stormy

Thursday, February 26, 2015

Pinwheel Star Quilt Tutorial

A little while ago I had a quilt idea pop into my head. It’s a pretty fun and easy quilt to make. So, I thought I’d write up a quick tutorial….

Pinwheel Star Quilt

I will post more pictures of it when it is quilted.  Life got in the way and it’ll be awhile before I can finish it; but I decided to write the tutorial sooner rather than later.

QUILT STATS

Each block measures 20 inches square.  The finished quilt is 3 blocks wide by 4 blocks long or 60x80.  I have written the fabric requirements and cutting instructions for individual blocks or for the entire quilt.  That way, you can easily figure yardage if you want to change the size of your quilt. I hope it’s not confusing!

FABRIC  REQUIREMENTS (for individual blocks or 60x80 quilt)

Background fabric – 1/3 yard for each block or 3 1/2 yards total

Fabric 1 (star points) – 1/3 yard each or 4 yards total.

Fabric 2 (center pinwheels and corner triangles) – 1/4 yard each or 3 yards total.

Because I was not planning on doing a tutorial when I made this quilt, I neglected to take pictures.  So, I made another block using different fabrics for this tutorial.

Fabric Requirements

Cutting Instructions

Background Fabric – cut (4) or (48) 6 in. squares and (4) or (48)  5.5 x 10.5 in. rectangles

Fabric 1 (star points)– cut (8) 5.5 in. squares

Fabric 2 – (pinwheel and corner triangles) – cut (4) 6 in. squares

Step 1

Draw a diagonal line across the back of all the Fabric 1 and Fabric 2 squares.

Step 1

Step 2

Layer background fabric squares with Fabric 2 squares RST (right sides together) and sew 1/4 in. away from drawn line.  Then, turn and sew 1/4 in. down the other side.

Step 2

Step 2b

Cut on drawn line to separate into 2 HST (half square triangles).

Step 2b

Step 2c

Press open and trim to 5.5 in. square.

Step 2c

Step 3

Lay out HST into pinwheel pattern.

Step 3

Step 4

Sew rows together using 1/4 in. seam allowance.  Press towards darker fabric.

Step 4

Step 5

Sew rows together.  (Press the seam open to help with the bulkiness in the center of the pinwheel.)

Step 5

Step 6

Align Fabric 1 square with Background Fabric rectangle RST.  Sew along line.

Step 6

Step 7

Trim off excess fabric by cutting 1/4 in. away from sewn line. Press open.

Step 7

Step 8

Align second Fabric 1 square along the opposite side of Background Fabric rectangle.  Sew along drawn line.

Step 8

Step 9

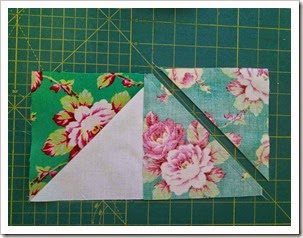
Trim excess fabric 1/4 in. away from drawn line.
Step 9

Step 10

Press open to form Flying Geese block.

Step 10

Step 11

Make row 1 and 3 by laying out HST’s with Flying Geese block.  Sew together and press toward the center block.

Step 11

Step 12

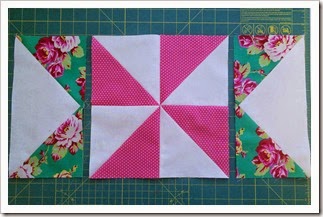
Make center row by sewing Flying Geese blocks to center pinwheel.  Press towards the Flying Geese blocks.
Step 12

Step 12b

Helpful hint – When sewing Flying Geese blocks onto pinwheel, make sure your stitches pass barely above the crossed stitches that make the point of the cream triangle.  That way, you will always get a perfect point.

Step 12b

Step 13

Lay out rows and sew together making sure to pin the corners and also matching the center of the pinwheel to the center of the flying geese block. Sew rows together. Press.

Step 13

Finished Block

Now make 11 more and sew together row by row and your quilt top is finished!

Pinwheel Star

I think I’ll make this block into a pillow for my daughter’s bed! Smile

Stormy